How we brew on our
Brewtools B80 PRO
Here is a description of how we, after a series of test brews, have found our way to use the B80,
and the changes and adjustments we have made.
Thanks to Carsten Holløse from Danske Øldommere / Brygklubben.dk
for good advice and guidance during the test period.
Setup
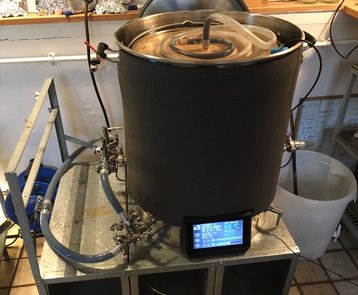
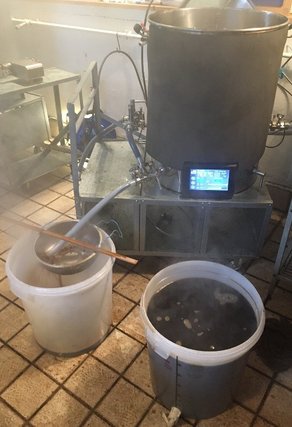
We have 3 pcs. three-way valves, all mounted on the left side. We do not need a valve on the right side, as we sparge manually.
In the photo, the chiller is not yet mounted, so the in and out hoses are connected.
The table is made of a shelf from Ikea called Hyllis. You can see a detailed description of the construction here (danish text, many pictures). The height of the table is 42 cm, and is a compromise between two factors: We want to be able to see the surface of the malt pipe when it is raised during sparging. And we prefer not to bend too much, when we operate the screen. The first factor is met, the second only to some extent. So we have just recently invested in the extension cables, so we can get the screen up to a comfortable height. Description and picture will be posted soon.

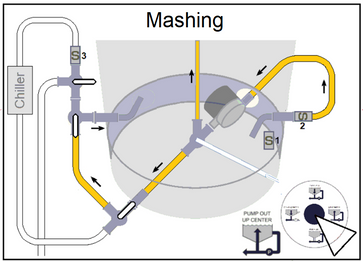
Mashing
We don't use the sparge pipe and the sparge hat. Instead, we have made a manifold, which we call The Superspreader. It is made of
2 meter silicone hose (13/19 mm) with holes in it, which is attached to the BT standard filter, which was left over, because we chose to buy the laser cut filter. The hose is mounted directly on the center pipe without any special connector. At the other end of the hose, a plug of a small piece of wooden log is inserted. The hose is fixed in three places on the filter, to keep the spiral shape. Strong copper wire has been used. The filter rests in three places: On the left handle bracket, on a small holder made of copper wire, mounted on the handle, and on the mash censor. A little part of the filter has been cut and bended, to make room for the censor holder.
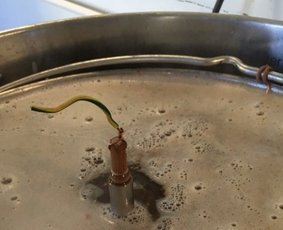
The picture to the right shows a small plug for the center pipe, made of a piece of 10 mm round rod with a piece of PVC hose at the end. It is used i.a. when we remove the spreader to stir around the mash, so that we avoid grain getting into the tube. And of course it is also used, when we raise the malt pipe. Before we do that, we straighten the copper wire so that it is vertical. At the top right of the picture you can see the small holder for the filter, which is mounted on the handle.
We are happy to have bought the mash censor. It is nice to have control over the temperature in the mash itself, and it is relatively easy to mount and dismount, when we want to stir the mash. And furthermore, it is nice, that they recently have added a decimal to the screen, so that, as with the tank and pump temperature, it is easier to see if it is in motion.
When we have added the malt, and distributed it well in the water, we mount the mash thermometer and the spreader, and sets the bottom valve between 3 and 6, so the wort is pumped up through the center pipe and the spreader. We constantly keep an eye on the mash not coming over the edge, and when it approaches, we move the bottom valve down at 6, until it is slightly sunken. Once in a while we remove the spreader and the censor, to stir in the mash. And of course we keep an eye on the temperature, and turns on the heaters if necessary.

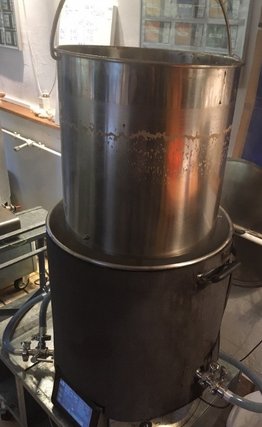
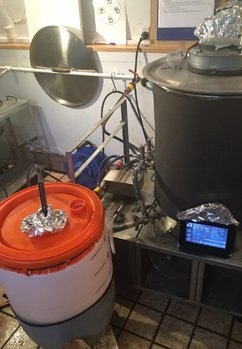
Sparging
We have a lifting system for raising the malt pipe during sparging. So we have chosen not to mount the hangers on the malt pipe, as they are not necessary. We sparge manually, with 78-80° C hot water from an external gas-heated pot. When the sparging is over, we roll the table away, so we can lower the malt pipe into a large bucket where it can drip off.
As shown in the section Cooling, we choose to empty the pot of any malt residue, so that our plate cooler doesn't risk clogging.
We have found that, even though we are careful, there is a slight risk of grain coming out in the tank, especially when we brew with max. volume. This can happen both when we stir the mash, and when the mash rises while the wort is supplied from the spreader. After sparging, we thus pour all the wort onto a couple of small yeast buckets, via a sieve. We typically find a few handfuls of mash on the bottom of the tank. We remove the mask, rinse the system well, and then transfer the wort back in the tank and starts the boiling.
Boiling
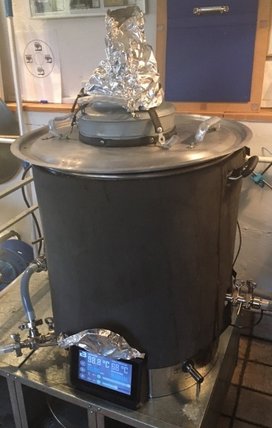
In one of the lids from our old system we have cut a hole, on which we can mount a transition piece, on which we will be able to connect a ventilation system, which is on the drawing board. We call it "Poor Man's Steamhat".
In the picture, some tin foil has been folded around the hole, in order to make the hole a little smaller, so we don't evaporate more than necessary. The lid is a little too big, which means that the em formed on the underside may drip onto the control screen. Therefore, the screen has been shaded.
When we are mentally ready, we will cut a hole in the original BT lid.
See details about the steam hat and ventilation here (in danish).
We use hop pellets, and like to use hop socks. We tie a string on the hop sock, which is mounted in the hole in the lid, to avoid the socks hitting the heating elements.
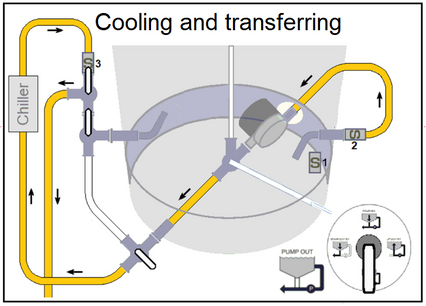
Cooling
This is the part of the brewing process on the B80, that has given us the biggest challenges.
After a series of experiments with the BT chiller, some of which together with our plate cooler (Blichmann Therminator), we have ended up using only the plate cooler. We prefer to use the cooling method called single pass, where the wort is led directly into the yeast tank, as soon as the cooling water is supplied. And this method does not suit the BT chiller, as shown in Brewtools' own test. They suggest that you return the wort to the tank, and waits to begin transferring to the yeast tank, until the desired temperature has been reached.
With the plate cooler and the single pass method, we can cool 50 liters of boiling wort to 20° C in about 8-10 minutes, where Brewtools' proposed method according to their own test takes a little over twice as long, with correspondingly more water consumption as a result.
The reason why we prefer to use the single pass method is not only the time and water consumption, but most important the fact, that the temperature in the tank in the non-cooled wort don't drops to more than about 90° C. And we feel most confident about that, in relation to the risk of infection.
The plate cooler, unlike the BT chiller, is sensitive to clogging. We have therefore, as described in the section Sparging, chosen to transfer the wort to a couple of yeast buckets after the sparge, in order to remove any residue.
The use of the plate cooler instead of the BT chiller also means, that we cannot make an efficient whirlpool to the same degree.
But we have not been able to do that with our old system either, and that is not something we as such have missed.
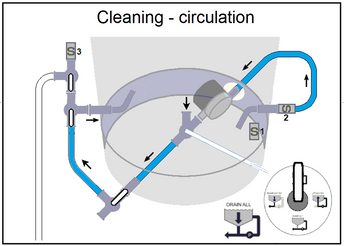
Cleaning
We remove the center pipe, as well as the plate cooler and the associated hoses. And then we follow the procedure below, which is inspired by a post by Claus Lücking in the FB user group here.
We have min. 50 liters of 50° C hot water ready in the sparging water tank, so we do not have to wait for the water to be heated.
- Set the bottom valve to 9, and rinse out visible snot.
- Add 25 liters of 50° C hot water, set the heat to 50° C in AUTO mode, and circulate with the pump. Finally, make sure that the heating elements are covered!
- Add 250 grams of PBW and let the liquid circulate for 15 min. with the bottom valve at 12.
- Scrub the heaters with a large bottle cleaner.
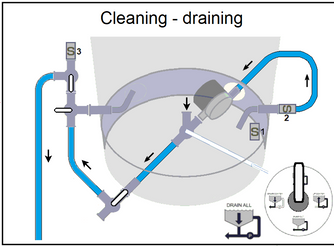
- Switch off the pump and heaters, empty the system (bottom valve at 9 am) and rinse thoroughly with cold water.
- Add 25 liters of 50° C hot water, as under step 2.
- Add 50 cl CIP Acid and circulate for 15 min.
- Switch off the pump and heaters, empty the system (bottom valve at 9 am) and rinse thoroughly with cold water.
- Drain all liquid. Empty the system with CO2.
- Remove hoses and valves. Do not wear lids when storing.
Kontakt: hansfrydendall@gmail.com